Search More DIY Craft

Tuesday, April 3, 2012

How To Make Orchid Flower Shoe Clips

Orchid flowers are becoming a very popular flower of choice for weddings. Lots of people love this flower because of its exotic look and its different varieties. Orchid flowers come in various colors shades. Colorful orchids are used in both home and wedding decor, while white orchids (silk flowers) are mainly used for wedding hair clips, brooches, and can also be used to make shoe clips that can be clipped to wedding shoes.

To make orchid flower shoe clips for your wedding shoes, you'll need the followings:

  1. A pair of white (or any color) orchid silk flowers
  2. A pair of shoe clip base. This will be used to fasted the flower to your wedding shoes.
  3. A glue gun with glue stick to glue the flower to the shoe clip base.
  4. Two nickle size white fabric pieces. This will be glued on to the shoe clip base to help protect your wedding shoe from the glue.
Everything you need

Now to begin making the shoe clips, first plug your glue-gun with glue stick insert into an electric outlet. You want this to be ready for glueing the flowers to the shoe clip base, and for glue the fabric pieces to the other side of the base. Next, cut off the stem, separating it from the base of the orchid.

Once the glue gun is ready, it's time to begin.

Step 1: Apply some glue the the back of orchid base and quickly press one of the shoe clip base unto the glued area (see Image 1 & 2).
Image 1
Image 2


Wait a few minutes for shoe clip base to set on the flower base before proceeding to the next step (step 2).

Step 2: Once shoe base is set, apply some more glue to the outside part of the shoe clip base and quickly press one of the fabric piece or flower petal unto the base, right unto the glued area (see Image 3).


Image 3
Remember this is to prevent the glue from getting on your wedding shoes, so be careful not to put too much glue as this can smear outside the fabric or flower petal piece.

Step 3: Clean any glue trace on flower petals and shoe clip base metal.

Repeat Step 1 through 3 to make the other shoe clip. *Take care to align the shoe clip metal base in the same direction on flower as the first (very important).

Once you're through with the other pair, your shoe clip is ready for wear. You can adorn your shoe clips with pearls and crystals to add a sparkling effect to it.

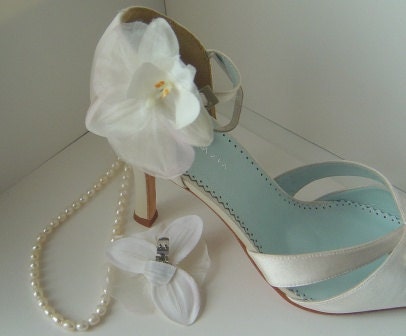
Isn't that beautiful?


If you still don't think you can make this and would rather have this made for your wedding, or buy one that's already made. You can visit my etsy store to place an order.


Wednesday, December 14, 2011

Make Your Own Candy Door Wreaths for Christmas

Candy wreaths, how so edible and so enticing. Anyone would want to eat them. But you gently knock at your host's door, fighting off every temptation to rip those candies off one by one.

Though edible, strictly for decoration!

Maybe you haven't seen these lately. I have, and the purpose of this post is to show you how you can make your own candy wreath. I especially like the peppermints ones, because you can make them in either the red and white, or the green and white peppermint candy mix. You can also make them mixing both color mix, red and white, and green and white.

What You Need:

  • White Styrofoam Wreath, about 12" to 14" in size (you can get this at any craft store or at Walmart)
  • Lots and lots of peppermint candies (red/white, or green/white, or both). About 300 counts if you plan to glue candies all around foam. These are cheaper at dollar stores.
  • Glue - with glue gun, or you can use crazy glue
  • 24 - 30 inch wired-ribbon to hang wreath, preferably red of green.
  • And, lots of patience.
Where to begin:

  • First, you want to unwrap the candies, a bunch at a time in case you don't use it all up and need to return to store.
  • Make sure your glue is ready. If you're using a glue gun, have it plugged, hot and ready to go at this point.
  • Using a linked-bracelet motion, begin gluing each unwrapped candy to the foam, making sure candies are as close as can be. Follow same pattern until all the foam is completely covered with candy.
  • Take the ribbon and wrap over and through the wreath. Tie once around the candy wreath and then to your door.
Your wreath is ready to welcome your holiday guests with the sweet aroma of peppermint as they approach your door.


Some people may like to have this over their fireplace mantel. That's okay as long as its just a decorative fireplace. Do not hang candy wreaths over a working (functioning) fireplace as candies may melt and make a mess due to heat.

And please, keep away from children, due to the fact that glue has been applied and could be toxic. This can also pose a choking hazard to little ones.

Have a Merry Christmas!